May Peas Be Upon You

After an extra 2 months of frosty winter weather, spring has sprung and so have spring’s veggies! And I’ve spent the past 2 months eagerly anticipating this spring’s first peas.  After listening to me talk about peas and how deeply my love of peas runs, a friend challenged me to cook a new dish with peas every day this month. And all I have to say is 

CHALLENGE ACCEPTED.

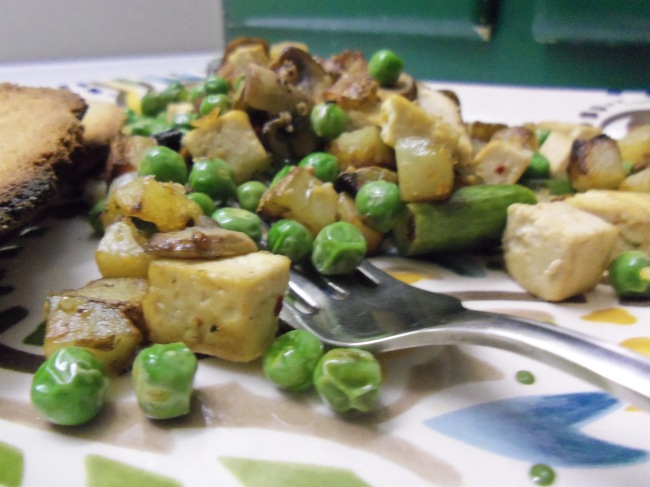
I’d like to start off this marathon of pea-based puns with a simple and easy saute of local, spring veg that also uses up some of the leftover root veg I’ve got sitting on the counter from this super long winter.

Peas with potatoes, asparagus, and mushrooms:

Image 

Ingredients:

  • 1 potato, diced
  • 2-3 stalks asparagus, chopped
  • 1/3 cup fresh shelled peas
  • 2 baby bellas, thinly sliced
  • 1/4 block firm sprouted tofu, diced
  • evoo
  • kosher salt
  • all-purpose seasoning

Directions:

  1. Heat a few tablespoons of evoo over med high heat.  Add the diced potato and a pinch of salt.  Cook the potatoes until crispy golden brown.
  2. Add the tofu and sprinkle generously with your favorite all-purpose seasoning. Let cook 5 mins till warmed.  
  3. Toss in the asparagus and saute 1-2 more minutes.  Add the sliced mushrooms and cook another minute before stirring in the peas.
  4. Let all the veggies saute 1-3 minutes until hot, but still crunchy.  Reseason as needed.
  5. Enjoy!!

Vegan (Avocado-based) Chocolate Mousse

Yes, it’s true!! Fluffy, rich, and decadent in less than 5 minutes – from The Sweetest Vegan.

Blend 4 ripe avocados, 1 cup agave syrup, 1 cup cocoa powder, 1/2 tsp instant coffee, and 1 cup unsweetened coconut milk in a food processor.

Voila!!

An Allergen-Friendly Birthday: Blueberry Grunt

This weekend we’re celebrating my roommate’s birthday.  But, we’re an allergen-sensitive duo.  Between the two of us, we need food that is gluten, dairy, egg, cruelty (yes, I’m allergic to cruelty), soy, and peanut-free.  At the same time, as two first-year grad students in a new town, I want to give my roommate a taste of her native Nova Scotia for her birthday away from home.

So here goes!

Allergen-friendly Blueberry Grunt:

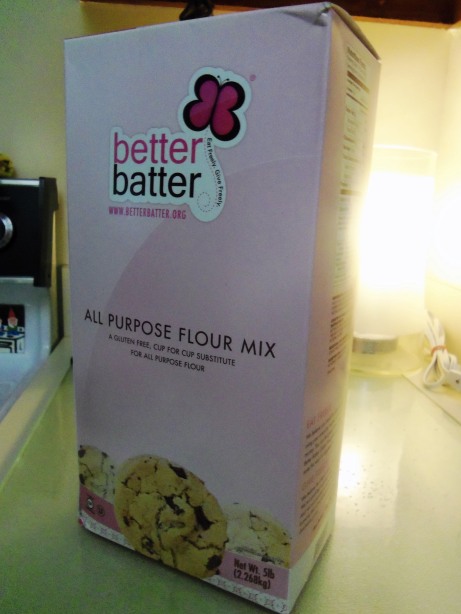
For this stove-top dessert, the hardest part is finding a soy-free all purpose gluten-free flour, but thanks to the careful eye of my mother, we found some! Thanks Mom!

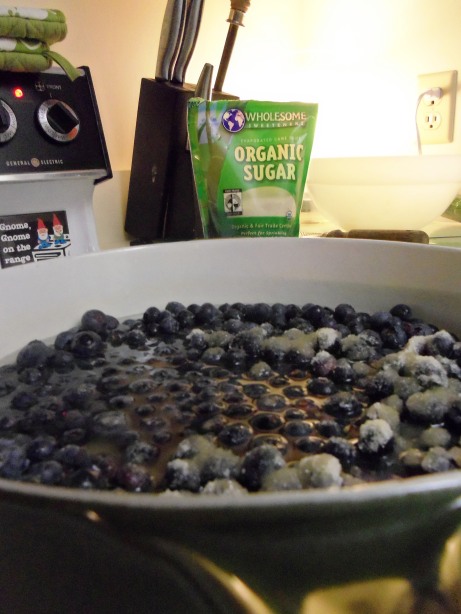
After that, it’s pretty much smooth sailing.  Heat 4 cups of fresh or frozen blueberries in a heavy-bottomed or cast iron pot with 1 cup water (less if frozen fruit) and bring to a boil.  Stir in 1 cup sugar (or 1/2 cup agave syrup) and the juice from one lemon.  Let simmer 15-20 mins until the blueberries are cooked down and ooey gooey good.

Meanwhile, in a large mixing bowl, stir together 1.5 cups flour, the zest of the lemon, 1/4 tsp salt, 1/4 tsp nutmeg, 1/2 tsp cinnamon, and 2 tsp baking powder.  With a fork, mix in 3/4 cups unsweetened coconut or almond milk.  Then plop the dumplings into the skillet full of blueberry sauce.

Cover with a tight lid and simmer over medium heat 10-15 mins until the dumplings are puffy and test done with a toothpick.  Serve hot in a bowl with cold almond yogurt or ice cream.

Happy birthday to my Canadian co-denizen!!   

Savory Vegan Succotash-Stuffed Zucchini

Here’s what I had:

  • A beautiful heirloom round yellow zucchini
  • 4 ears of white sweet corn
  • 1 pt of fresh shelled lima beans
  • 1 lb. of baby purple-skinned potatoes
  • A few red onions
  • Leftover fresh baby spinach
  • Various pantry odds and ends

Here’s what I made:

Vegan Succotash-Stuffed Zucchini with Roasted Baby Purple-Skinned Potatoes


Here’s what I did:

I sliced the potatoes thin, coated them with oil and some Spike’s Veg Magic and baked them at 425F for 15-20 mins.  Wanted to get the taters done first so I could snack on them while cooking the rest!

While the potatoes cooked, I scooped out the middle of the zucchinis and mashed up the insides with 2-3 Tbsp of nutritional yeast and some Kosher salt.  I sauteed 2 small red onions and a clove of garlic in some coconut oil and then added the limas.  I put a lid on the pot and left them alone until the lima beans were bright green and tender (about 3-4 mins).  Once the limas were tender, I added the cheesy squash and the corn.  I let that get happy for another 2-3 mins before tearing up some spinach and letting it wilt in.  The zucchini and corn were both sweeter than I was feeling for dinner, so I had to taste and adjust the seasonings a few times.

Suffering Succotash! …Couldn’t help myself

Meanwhile, I gave the round zucchinis a massage in some evoo, Kosher salt, and black pepper.  I reduced the heat on the oven to 375F (the potatoes were long-since done and already being snacked on).

It’s like they were calling my name!

I baked the zucchini for about 15 mins, or until just short of tender.  Then, I stuffed the zucchini halves and baked them for another 5-7 mins, or until the squash were tender and juicy (but not at all mushy).

Little heirloom boats of awesome waiting for the oven

At the end, I layered the leftover potatoes in a casserole dish and topped them with the juicy leftover succotash.


What would you have made with these ingredients?  Do you prefer to plan out your meals or just jump in the kitchen and see what happens?  Does your cooking style change from season to season like mine?


Tangy Golden Beets over Bell Pepper & Brown Rice

To my lone loyal reader (Hi Mom!), I wanted to start this with a quick explanation about what I’ve been up to and why my recipe posts have come to a complete stand still.  Summer’s here, and that means I’ve been able to cook lazy.  The bounty of amazingly colorful and delicious produce that’s available during the summer means I don’t need recipes!  I just layer whatever veggies were available at the market in a casserole dish with some salt and pepper or throw them in a pot with some fresh made stock and voila! Good eats every time.

There’s something so organic about cooking this way.  Maybe it’s because I’m now going into my 3rd year of giving up the pre-packaged foods and I’ve got some cooking chops now, but I love how confident I can be with my food without any of the meticulous meal-planning I have to do the rest of the year.  I thought this recipe would be a good example of my lazy summer cooking style.  It combines tangy vinegar with a mishmash of sweet earthiness from beets, bell pepper, and brown rice.  Love!

Tangy Beets and Greens over Bell Pepper Brown Rice:

I can’t get over the colors! Mmmmmmm!

Equipment: This is not a one-pot meal because the cook time for everything is long! 

  • 2 medium sauce pans with lids, 1 medium saute pan, 1 large sauce pan (or small ss pot) with lid, colander, stove top

Ingredients:

  • 1 red onion, half cut into thin slivers, half diced
  • 2 cloves garlic, chopped
  • 1 green bell pepper, small dice
  • 1 bunch (4-6) beets with greens
  • 1 cup brown rice
  • (Brown) rice vinegar
  • Lemon or lime juice
  • Coconut (or other high-temp) oil
  • Evoo
  • Water
  • Kosher salt and ground black pepper

Directions:

  1. Bring the brown rice, a hearty pinch of salt, and 2 cups water to a boil over high heat.  Reduce the heat and let simmer on low until the center of the rice is translucent (white center = raw rice).
  2. Meanwhile, scrub the beets and cut off the greens.  Trim both ends off the beets, add to a saucepan, over with approximately 2 inches of water, and bring to a boil.  Let the beets boil until they’re fork tender (30-45 mins depending on the size of your beets).
  3. Over medium high heat, warm the coconut oil in the large saucepan.  Add the sliced onion and a pinch of salt.  Saute for 1-2 mins, until starting to soften and then add one clove of chopped garlic.  Saute another minute until starting to brown.  Make sure the beet greens are well cleaned.  Add the wet greens and 1/4 cup water to the hot pan and close with a lid immediately (try to do this all in one movement to capture the flash of steam).  Reduce the heat to medium and let the beet greens steam.  After about 7-10 minutes, you’ll notice most of the water has evaporated off and the bottom of the pot should have a nice golden brown caramelization on the bottom.  Quickly add another 1/4 cup of water to the pot.  After 2-3 mins, you’ll see that the beet greens are completely wilted and have started to soak up the browned pan drippings (yum!!).  Remove the greens from the heat.  Give them a dash of salt, a generous pinch of black pepper, a drizzle of rice vinegar, and half a drizzle of lime juice.  Use a wooden spoon to scrape up all the delicious brown bits on the bottom (creates a deliciously tangy sauce with the leftover water).  Set aside.  This is hands-down my favorite way to cook dark leafies – works great with kale, chard, spinach, etc!
  4. Meanwhile, over medium heat, heat a light drizzle of coconut oil in the saute pan.  Add the diced red onion with a small pinch of salt and saute for 1-2 mins.  Add the second clove of chopped garlic, and saute 2-3 more mins until both are just starting to brown.  Stir in the diced bell pepper with a pinch of salt and pepper.  Once the green bell pepper is just tender but still has some crunch (2-3 mins), remove the veg from the heat.  Once the brown rice is done, stir it in with the bell pepper and onion.  This would be great with some fresh chopped parsley!
  5. Once the beets are tender, strain them, and run them under cold water while peeling them (the skin is tender enough to easily rub off with your fingers – no peeler needed!).  Halve/quarter them, drizzle with a touch of evoo, and sprinkle on another drizzle of rice vinegar, half a drizzle of lime juice, a pinch of kosher salt, and a big pinch of black pepper.  I’ve noticed that the golden beets are sweeter than red beets, so an extra hit of vinegar and citrus help balance out the intensely earthy sweetness.
  6. Enjoy!!

Special thanks to my friend Janet for teaching me how to properly enjoy beets! 🙂

Homemade Non-Toxic EcoLogical Cleaners

The weather is slowly starting to feel like spring, and with all of April’s shower’s on their way, so is spring cleaning!  Recently a thought struck me: despite what’s advertised as the header of this blog, I never did upload any how-tos for homemade cleaners.  Well I’ve got some time tonight, so here goes!  Oh, and please note: I do not make my own soaps.  I buy biodegradable, non-toxic soaps that I can find on the cheap.  If you’re looking for soap recipes, I am too!!  I’m still looking for some that I can A) afford all the ingredients and B) are not oil based.  If you have a good recipe for homemade soaps that don’t use single-use ingredients (as in, stuff I have to buy just for making soap) let me know in the comments please!!

Why making your own cleaning products is green:

  • They’re non-toxic, and part of being environmentally friendly means keeping your immediate environment people-friendly.  Filling your home with caustic and flammable agents that may be lethal to people and pets doesn’t sound like a very friendly environment to me!  Please do your research on prolonged exposure and possible effects of latent toxicity before wiping down your dinner table with bleach and other products!  I won’t get on a soap box here, but as a Psychology student, I care about brains.  And the effects of environmental neurotoxins is scary, especially considering the heightened susceptibility of certain groups, like children, women of reproductive age, and the elderly.  Just say “No!” to toxic cleaners!!  Toxicity is avoidable!!
  • After scrubbing your shower with whatever noxious substance you’ve chosen, it doesn’t go away once it goes down your drain.  If it’s hard to stay in the confined space of a shower with those fumes, imagine how the creatures in your local watershed feel when that stuff inundates their habitat!
  • How many cleaning products do you own?  Remember my mini-rant about the treadmill of hair-product production?  Apply the same logic here.  Doesn’t it just make sense to use one or two products to clean everything you own rather than buy a specific cleaner for each thing you own?

Why making your own cleaning products $aves green:

  • Buy 4 items (all under $2), make enough cleaners to last you at least 6 months. Less than $8 for 6 months.  Where’s the question???

I borrowed this book from my mom. It's my new favorite book! Oh and, Mom, if you're reading this, I don't know if you should honestly expect to get this back.

What you’ll need:

  • 1 gallon white distilled vinegar
  • 1 lb. box baking soda
  • 1 Liter bottle of club soda
  • Salt

Other stuff you can add:

  • Lemon juice
  • Essential oils (for more pleasing smells)
  • Borax (for the really tough grime)

**A quick note about vinegar-based cleaners:  You absolutely will get used to the smell!!  You had to learn to associate the smell of bleach and other toxic products with “clean” and they don’t actually smell good either! Also, unlike the store-bought versions, once the vinegar has evaporated, the smell is gone!**

Cleaners

All-purpose surface cleaner: Fill a spray bottle with equal parts tap water and white vinegar.  Add lemon juice for extra disinfecting power (or increase vinegar concentration) or essential oil for scent if desired (applies to all vinegar-based cleaners listed).  Safely cleans glass, stainless steel, wood, painted surfaces (like walls) and plastic laminates.

Floor cleaner: 1 cup white vinegar to 1 gallon tap water.

Stainless steel surface cleaner:  Spray a mist of undiluted white vinegar and then buff with a cloth.

Teapots: Boil equal parts vinegar and water.  Let stand an hour and then rinse with cold water.

Drain cleaners: Pour 1/2 cup of salt and then 2 cups boiling white vinegar down the slow, stinky, or clogged drain.  Flush out with hot then cold tap water.

Bathroom scrubber/mildew remover:  Spray a light coating of the all-purpose surface cleaner.  Then sprinkle on some baking soda and scrub until clean.  Rinse with cold water.  For tough stains, try mixing 3 Tbsp white vinegar, 1 tsp Borax, and 2 cups of hot water and scrub in your solution.

Sticker and other goo remover:  Apply white vinegar directly to the sticker.  Let soak in 30-60 seconds and then scrub with steel wool.  Let soak 10-15 mins if removing tough stickers like bumper stickers from cars.  Soaking a spot will also work for residue-free sticker removal from clothing!

Window Cleaner:  Use a recycled spray bottle to mist windows and mirrors with club soda.  Wipe clean with crumpled newspaper for a streak-free shine!

Windshield wiper cleaners:  pour some undiluted vinegar on a cloth and wipe down your windshield blades to clean away built up dirt and extend the use of your blades.

Toilet cleaner:  Pour 2 cups of white vinegar in your toilet bowl and let it sit over night to remove spots and rings.

Shower heads: Soak your shower head in a bag filled with white vinegar for an hour (tape the bag up so you can leave it while it soaks).  Wipe the shower head clean with a damp cloth.

Brighten yellowed clothing: Dilute 1 cup vinegar to 1 gallon warm tap water.  Let the clothes soak overnight and then wash the next morning as usual.

Stain treatment:  Most stains can be removed by rubbing the spot with undiluted white vinegar before washing (including yellowing from deodorant and perspiration).  If the stain is really bad (like from hair dye or wine), treat the spot immediately, wash immediately, and add 1-2 cups of vinegar to the wash cycle.

Electronics cleaner: Make sure your appliance is completely turned off.  Lightly dampen a cloth with equal parts white vinegar and water.  Be sure not to completely saturate the rag (or if you do, wring it out well) because you don’t want any excess water or dripping!

Dingy carpet brightener: Spray the worn carpet with 1 cup white vinegar diluted in 1 gallon of tap water.  Scrub the solution in with a clean stiff broom or sponge mop.  Let dry.

Carpet spot remover: Dilute 2 Tbsp salt in 1/2 cup white vinegar.  Apply the solution to the stain, let dry, and then vacuum.  For really tough stains, mix 1 Tbsp cornflour with 1 Tbsp vinegar and scrub the paste into the spot.  Let it sit for 2 days to ensure it’s thoroughly dried and then vacuum.

What are you waiting for?  Get cleaning!! 🙂

Roasted Red Pepper and Spinach Lasagna

I don’t make that many lasagnas.  I don’t know why.  They’re the perfect way to eat GF pasta (which can often turn out less than stellar).  I’m not sure if it’s that they intimidated me, or if I thought they were too much work.  But!  Nevertheless with my success with this recipe, I’ve got a new regular dish to add to my rotation, and I’ve found my lasagna mojo!  I made this lasagna using a creamy white wine tomato basil sauce that uses ground roasted cashews to replace the cream, and it came out absolutely fantastic!  Because I haven’t had much time these day to head to the market, I’ve had to focus my cooking efforts to include convenience without sacrificing quality.  So for this recipe, I used both fresh and frozen ingredients, allowing me to maximize flavor, health, and convenience.  A homemade sauce, fresh herbs, and high-quality store-bought products made this dish healthy and easy.  This recipe is great for a busy weeknight but still satisfying and impressive enough to share with friends on the weekend.   A new favorite!

Roasted Red Pepper and Spinach Lasagna:

Oh lasagna, I'm so glad we're friends now.

Equipment:

  • Medium casserole dish, food processor, medium saute pan, large stainless steel pot with lid, colander, wooden spoon, spatula

Ingredients:

For the sauce

  • 3 fresh tomatoes, 1 chopped into big chunks, the other 2 diced
  • 1 Tbsp tomato paste
  • 1/2 heaping cup of roasted, unsalted cashews
  • 2 small yellow onions, diced
  • 4 cloves garlic, chopped
  • ~10 big fresh basil leaves, cut into small ribbons
  • 1/4 evoo
  • Dry white wine (to taste)
  • Water (as needed)
  • Kosher salt and ground black pepper

For the lasagna

  • ~10 fresh basil leaves, whole
  • 10 oz. frozen spinach
  • 6 oz roasted red peppers, in water/vinegar brine (not oil), cut into strips
  • 1 box (GF) lasagna noodles, prepared according to package directions
  • 1 block soft tofu, sliced thin
  • Spike’s low-sodium vegit magic
  • (GF, Vegan) Breadcrumbs (mixed with 1-2 tsp of dried parsley and a pinch of salt and pepper)
  • Kosher salt and ground black pepper

Directions:

For the sauce

  1. Add the cashews, tomato that was roughly chopped, tomato paste, 2-3 Tbsp of water and a big pinch of kosher salt to the food processor.  Blend, scrape down the sides, and keep blending until the mixture is silky smooth.
  2. Heat the oil over medium heat and add the onion.  Saute 2-3 mins until softened and then add the chopped garlic.  Saute another 2-3 mins, or until the garlic and onions are just starting to brown.  Add a big pinch of salt, pepper, the diced tomatoes and the cashew-tomato mixture from the blender.  Let cook 1-2 mins, or until simmering.
  3. Once the tomatoes are starting to get hot, add 2-3 splashes of a dry white wine (to taste) and/or a few Tbsp of water.  Without extra liquid the sauce is very thick and creamy.  I wanted mine a little thinner, so I ended up adding probably 3-4 Tbsp of wine and the same amount of water.  Add the basil and let simmer together 5-10 mins or until all of the flavors are deliciously incorporated.

For the lasagna

  1. Preheat the oven to 350 F.
  2. Grease the casserole dish with evoo.  Lay down one layer of lasagna noodles.  Then, lay down a thin layer of roasted red pepper slices (just dot the bottom with 10-12 pieces. It doesn’t need to be a continuous layer).  Top the pepper slices with a thick layer of spinach, and then spoon on a generous layer of 1/3 of the sauce.
  3. Top the sauce with another layer of lasagna noodles.  Then, lay down a layer of the sliced tofu (should use the whole block).  Top the sliced tofu with a generous sprinkling of Spike’s seasoning, a sprinkle of salt, and a generous layer of the fresh basil leaves.  Top the tofu-herb layer with spinach and then another 1/3 of the tomato sauce.
  4. Add the last layer of noodles.  Top once again with a layer of roasted red pepper strips, a thick layer of spinach and the last 1/3 of the sauce.  Sprinkle on a generous topping of the seasoned (GF Vegan) breadcrumbs.
  5. Bake at 350 F for 30-40 mins, or until the top is crunchy and the sides are bubbling.  Broil for 1-2 mins if needed to toast the breadcrumbs (I’ve found that some GF breadcrumbs don’t toast easily unless under direct heat).
  6. ENJOY!!

“Creamy” (Cashew) White Wine Tomato Basil Sauce

I would like to give a shout-out to my girl at OnMyWayToHealth for pointing me in the direction of this recipe!  This is an absolutely AWESOME creamy tomato sauce recipe without the cream!  Cashews blended with a fresh chopped tomato and tomato paste provide a tangy-sweet and creamy base for an amazing but simple Italian classic white wine tomato basil sauce.  As OnMyWay notes, this recipe is great for those transitioning to vegan and trying to satisfy lingering creamy cravings and also as a nice change from the typical red pasta sauce.  Every kitchen needs a few good pasta sauce recipes.  Come summer, we’re all going to need as many tomato recipes as possible, and I’m really excited to be able to add this one to my recipe box!

“Creamy” Tomato Basil Sauce:

Equipment:

  • Food processor, medium saute pan, wooden spoon, spatula

Ingredients:

  • 3 fresh tomatoes, 1 chopped into big chunks, the other 2 diced
  • 1 Tbsp tomato paste
  • 1/2 heaping cup of roasted, unsalted cashews
  • 2 small yellow onions, diced
  • 4 cloves garlic, chopped
  • ~10 big fresh basil leaves, cut into small ribbons
  • 1/4 evoo
  • Dry white wine (to taste)
  • Water (as needed)
  • Kosher salt and ground black pepper

Directions:

  1. Add the cashews, tomato that was roughly chopped, tomato paste, 2-3 Tbsp of water and a big pinch of kosher salt to the food processor.  Blend, scrape down the sides, and keep blending until the mixture is silky smooth.
  2. Heat the oil over medium heat and add the onion.  Saute 2-3 mins until softened and then add the chopped garlic.  Saute another 2-3 mins, or until the garlic and onions are just starting to brown.  Add a big pinch of salt, pepper, the diced tomatoes and the cashew-tomato mixture from the blender.  Let cook 1-2 mins, or until simmering.
  3. Once the tomatoes are starting to get hot, add 2-3 splashes of a dry white wine (to taste) and/or a few Tbsp of water.  Without extra liquid the sauce is very thick and creamy.  I wanted mine a little thinner, so I ended up adding probably 3-4 Tbsp of wine and the same amount of water.  Add the basil and let simmer together 5-10 mins or until all of the flavors are deliciously incorporated.
  4. ENJOY!!

Vegan Tamale Pie

What’s Tamale Pie?  I’d never heard of it until I saw this video recipe on YouTube.  I instantly saw that recipe full of ground beef and white flour and thought “Yeah, I can make that GF vegan.”  It turns out that Tamale Pie is one of the most delicious Tex-Mex casseroles I’ve had in a looong time.  It’s a layered casserole of spicy veggies and homemade cornbread that is very freezer-friendly.  I’ve been keeping pretty darn busy over the past few months, so I’ve had to maximize my time by taking advantage of my stock of pre-chopped frozen veggies.  I could also see this casserole lending itself easily to using up leftover roasted veggies.  Of course, I’d prefer fresh veg, but hey, if using frozen veggies means I get a hot homemade meal in the middle of the work week, then I’m all about it!

Vegan Tamale Pie: 

Fresh cornbread and spicy veggies are a magical combination.

Equipment:

  • Heavy-bottomed/Cast-Iron skillet with lid, liquid & dry measuring cups, measuring spoons, large casserole dish, medium mixing bowl, wooden spoon, spatula, knife, cutting board, range

Ingredients: (makes a gigantic casserole for a week+ of eats – feel free to cut the portions down!)

  • 1 16 oz bag of assorted frozen veggies, thawed – I used a mix of organic carrots, broccoli, green beans, spring peas, lima beans and onions.  But when I make this again with fresh veggies, I’ll probably go for peppers, broccoli, and summer squash
  • 12 oz frozen corn
  • 2 yellow onions, cut into 1/4″ half-moons
  • 4 cloves garlic, roughly chopped
  • 1 “can” of kidney or black beans
  • 1/2 cup TVP
  • 1 1/2 cups vegetable stock
  • 1 jar of your favorite salsa
  • 2 tsp smoked paprika (more to taste)
  • 1 Tbsp cumin (more to taste)
  • Dried or fresh cilantro to taste (optional)
  • Kosher salt
  • Ground black pepper
  • 1 cup GF AP flour
  • 1 1/4 cup cornmeal
  • 3/4 tsp sea salt
  • 1 cup unsweetened, unflavored soy milk
  • 6 Tbsp water
  • 2 tsp raw vegan sugar
  • 4 tsp baking powder
  • 1/4 cup sunflower or other neutral oil
  • Vegan cheddar slices (I used this time, but I really don’t think it’s necessary if you’re not into substitute cheeses. I’ll probably leave this out next time.)

Directions:

  1. Preheat the oven to 425 F.
  2. Combine the GF flour, cornmeal, sugar, and baking powder in a medium mixing bowl.  Add the oil, soy milk, and water to the bowl and mix with a fork.  Batter should be runny and still somewhat lumpy.  Don’t worry about getting it smooth. Set aside.
  3. Over medium heat, saute the fresh onions for 1-2 mins and then add the fresh garlic.  Saute another minute, or until the veg are starting to soften.  Add the beans and a generous pinch of salt and pepper.  Stir and heat 1-2 mins or until the beans are heated through.
  4. Add the thawed veggies, the jar of salsa, 2 tsp smoked paprika, 1 Tbsp cumin, the textured vegetable protein, and the veg stock.  Stir, season with salt and pepper to taste.  Then cover and reduce the heat.  Let the veggies simmer 5-10 mins or until most of the liquid has evaporated. Taste and re-season as needed.
  5. Grease the bottom of your casserole dish.  Pour in half the cornbread batter and then evenly sprinkle a layer of corn kernels over the cornbread batter.  Carefully spoon the hot veggie mixture over the cornbread batter.  Because the batter is runny, you want to prevent it from just running up the sides of the dish.  If you’re using vegan cheese, grate or shred your cheddar into the other half of the cornbread mixture and then pour the cheesy cornbread batter over the hot veggies.
  6. Bake uncovered for 45-60 mins at 425 F, or until the top cornbread is a deep golden brown and the contents are bubbling hot.
  7. ENJOY!!

Curried Veggie Fried Rice

I’ve had a pretty busy couple of weeks, which for me usually means two things: 1) I don’t have time to cook and 2) as a result, I spend way too much money on quick eats (and believe me, gluten free, vegetarian fast food is pricey!).  Now that things have calmed down a bit and I’ve got some time off to recover, I’m stuck with the carry-over money shortage.  And so, this fried rice was really a “what do I have?” version of what it could be (produce-wise).  In desperate need of a fresh veggie infusion, I coughed up a couple bucks on a pound of green beans and some zucchinis.  And holy crap does this simple recipe deliver!  I love it when new recipes go as planned 🙂

Granted, this veggie fried rice will be soooo much better come Spring when the spring onions, baby corn, asparagus, and carrots come back.  But for now, adding curry paste to a more traditional fried rice, gives this recipe a nice spicy Thai kick that was exactly what I needed.  I foresee the beginnings of a long love-affair between myself and homemade fried rices!

Simple Curried Veggie Fried Rice:

Best GF, vegan fast food I've had all week!

Equipment:

  • Large ss pot with lid, slotted spoon, wok/round-bottomed pan, knife, cutting board, stove-top, couple of medium and small bowls

Ingredients: (as shown in photo; add/replace veggies by availability)

  • 2 small yellow onions, sliced into 1/4″ half-moons
  • 1 lb. green beans, trimmed and sliced length-wise (because I had the time!)
  • 2 zucchinis, halved and sliced
  • 2 cloves garlic, chopped
  • 1 block extra firm tofu, strained if needed and chopped into small cubes (could replace with a scrambled egg if desired)
  • Sunflower or peanut oil
  • 2 cups vegetable stock (optional)
  • 1 cup white rice
  • 1 Tbsp red/green/yellow curry paste (whatever you’ve got/prefer)
  • 3 Tbsp liquid aminos (or other GF soy sauce)
  • 1/2 tsp siracha sauce
  • 1/2 tsp sea salt
  • 1/2 tsp raw sugar
  • Dried or fresh cilantro (to taste)

Directions:

  1. Fill your large stock pot with water, cover and bring to a boil.  Add a generous pinch of salt, and then blanch the green beans for 30-60 seconds.  Scoop them out with a slotted spoon.  Repeat for the zucchini, but blanch them a bit longer, maybe 1-2 mins.  Set the veggies aside.  Don’t discard the blanching water yet!
  2. In a small bowl, combine the curry paste, soy sauce, chopped garlic, salt, and siracha.  I typically dislike cilantro, but I like what it does to balance out soy sauce in some sauces, so I added a hit of dried cilantro here too.  If you’re a cilantro enthusiast, go for fresh and go wild.
  3. Heat the wok over med-high heat.  Drizzle a couple of Tbsp of oil and throw in the onions.  Stir-fry 1-2 mins, and then add the tofu cubes.  Stir-fry and additional 2-3 mins.
  4. Add the rice.  Stir-fry the rice with the onions and tofu cubes 2-4 mins, or until the tofu and rice are starting to brown.  Pour in the curry mixture and then stir-fry another minute.
  5. Pour in the veggie stock or two cups of the blanching water you used for the veg.  Bring to a boil, then reduce the heat and let simmer 10-12 minutes, adding more water as needed and simmering until the rice is cooked.
  6. Add the veggies.  Top with sesame oil, toasted sesame seeds or crumbled peanuts, and/or fresh cilantro if you’re feeling fancy.
  7. ENJOY!!